- Services
- Dynamic Captions
- Animated Avatars
- BWT Videos
- ChatBot Agents

AI ChatbotsSupport more customers with a friendly greeting and helpful chatbot agent.
- Chatbots Category
- Video Editing
Mobile App Builder Tutorial How To Build A Mobile App


This Service DISCONTINUED
Step 1. Select a template
We offer templates for all walks of life from Auto Dealer to Utility company to restaurant to business owner.
How to Use The Template Library in Mobile App Builder


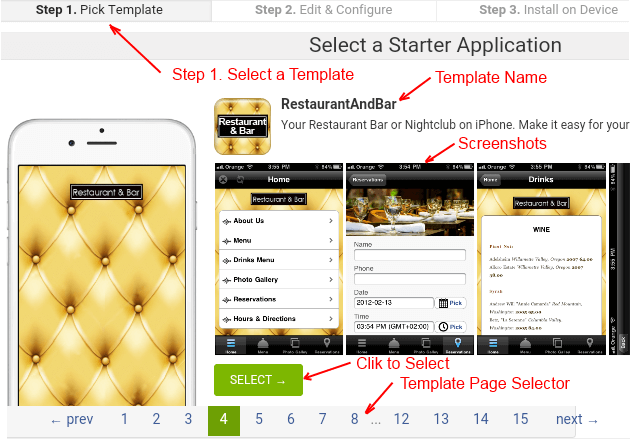

You will see later on how to add and substract pages. All templates can be modified to the look and feel you like most. That said when searching for your starter application look for features that you want most. Click the SELECT button. Click on the screenshots to see a larger view of some of the pages in the template.
Step 1a. Select starter platform and Preview your app
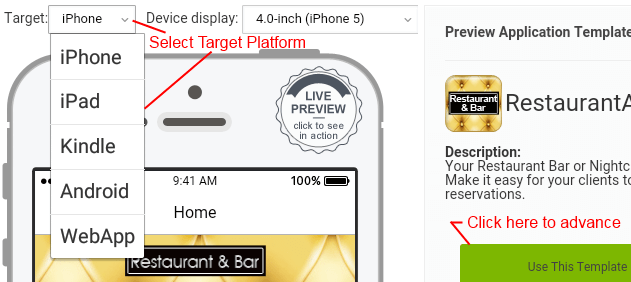
Before you click the USE THIS TEMPLATE button there are two settings you need to do first. From the Target pull down menu select target platform you want to work in. This can be changed so it is okay to play with different platforms. However, if you choose a plan with more than one app you can duplicate it to any other platform after you have finished building your first app.
Tip: It is best to start with an iOS app if you plan to do more than one version. iOS app convert to Android apps better than the other way around.
Step 1b. Select a Device Display
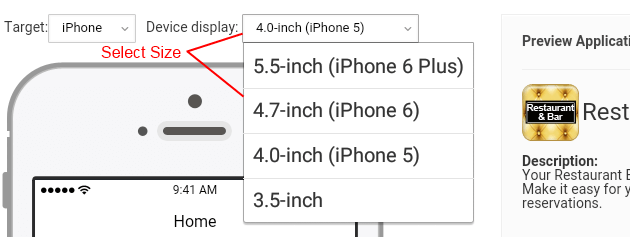
Here is where you select size you are targeting. This option can be changed later but only to other sizes in your chosen platform. However, if you selected a multiple app plan you can duplicate your app to any other platform and size.
Tip: designing for the smallest screen size will ensure it fits on larger screens. Whereas designing for a larger screen could result in smaller screen size template inconsistencies. It is possible to design and publish for only iPad and tablet. Plan which screensizes you publish to is important at this stage.
Step 1c. Preview Your Template
The template is now active. Click on the tabs and buttons in the simulator to navigate through the template. When you are happy click the Use This Template button.
Naming Tip
There is a generic name supplied in App ID: box that you can use. You can leave the name in the box and continue or change it if you like.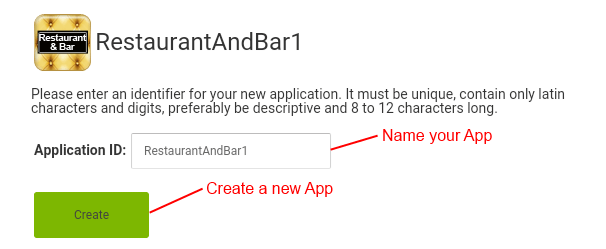
On the next page you name your app. The App ID: becomes a unique identifier for your new application. It must be unique and can only be used once per platform. Type in your new name in the Application ID: box.
This ID: cannot be changed. Later on you can give your application a different name to publish under. Example: the App ID is RestaurantAndBar1 but the app is published under the name MyFavoriteRestaurant.
When you are happy with the name click Create button.
Configure Your App in the Mobile App Builder
Step 2. Configure Your App
Tabs Tip
Tabs are configured in the 'Navigation Settings' section of the mobile app builder.
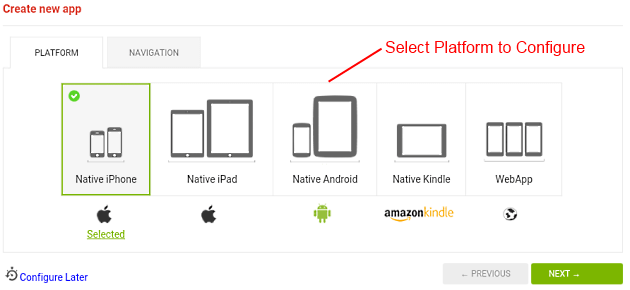
This is where you set and configure your app. Initially the platform you selected in the previous step is pre-selected for you. You could change this now but normally you should not need to. When you are happy with your settings, click the NEXT button.
You can use the supplied icon, select from our library or upload your own icons.
Step 2a. Set Navigation Tabs
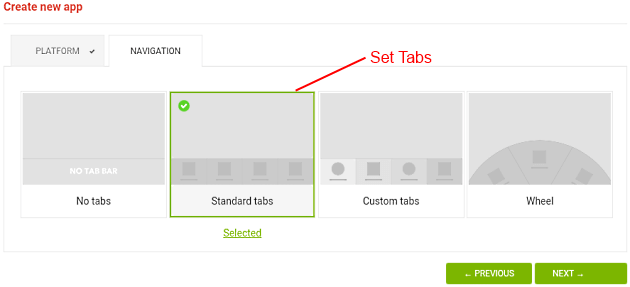
"Standard tabs" gives you a set of standard navigation icons to start with. "Custom tabs" allows you to do additional customization of the tabs. "Wheel" tabs creates a circular wheel of tabs.
In this step of the mobile app builder you select which type of navigation tabs you want to start with. "No Tabs" removes the navigation bar and inserts an 'index' page for tab 1. The index page will be a menu page.
Custom tabs option gives you the ability to add more styling to the tabs. For instance you can change the background color when the the tab is selected. This improves user experience because they know which tab they are on.
Note that pages below the 'Tabs" will not have the tab menu showing, but do show a back arrow so the user will know whether they are on a tab or a tier 2 (or3) page.
Step 2b. Set the Theme
The next step is to select a theme. In this case you have "Light" and "Dark" "Light" makes the background color white and the text black. "Dark" makes the background black and the text color white. Element styling is acheived in the editor section of the mobile app builder. You can style each element on the page individually.
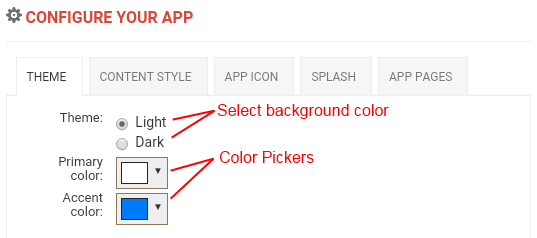
You can select any color you like for the background and accent using the Color Pickers. The "Primary" color picker sets the background color. The "Accent" color changes the color of links and back buttons.
Be sure to test your selections in the simulator. When satisfied click the NEXT button. Best practice it to fill in the settings as best as possible when starting a new mobile app.
Step 2c. Set the Content Style In The Mobile App BuilderDesign Tip
Most of the settings can be changed at a later time.
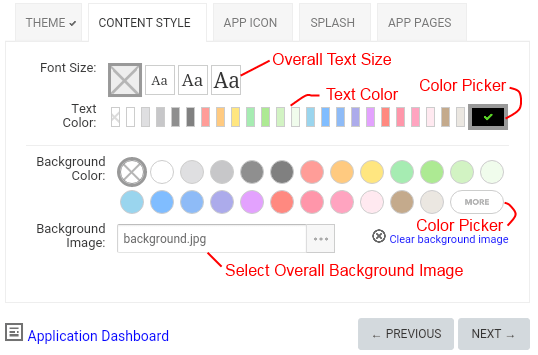
On this page you set the way your overall content looks on your app. You can set text size, text color, background color and select a background image in the mobile app builder. Be aware that you can always come back to this page and make changes later.
It may be better to accept the presets and continue. The pre-set values on this page have already been optimized for each app.
Use the color pickers to select more refined colors. The color pickers are pre-set with the app's colors already in it. By selecting the color pickers you can see what the pre-sets are.
You can select a new color or enter a 6 digit hex code to further refine your choice. When satisfied with your choices click the NEXT button.
Step 2d. Set the App Icon
App Icons
App Icons are loaded in the "App Multimedia" section in the 'Editor' of the mobile app builder.
![]()
All templates come with a generic app icon. The App Icon is used in many places but more importantly it identifies your app. This is the icon that opens your app om a nmobile device. Read the bio on the following image.
The Change link opens a dialogue box with two options. First option allows you to upload your own icon. The second option allows you to pick one from our gallery.
Before you can publish you will be asked to upload 3 more App Icons of various sizes. MAM can do this for you, included with your subscription plan. You may want to accept the supplied icon to start with, you can change this later. When satisfied click the NEXT button.
Step 2e. Set the Splash Page
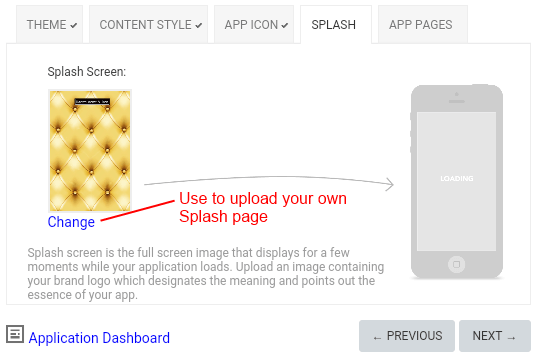
The splash page appears when the the app is loading into your device. You must have a Splash page to upload to the app stores. You can accept the one supplied with your app template or create your own in the 'Editor' section of the mobile app builder.
Be sure to read the bio in the image below.
The Change opens a dialogue box that allows you to upload your own icon. You may want to accept the supplied Splash page to begin with, you can always change it later. When satisfied click the NEXT button.
Step 2f. Set Your Pages
Edit Pages
Pages can be added, deleted and edited in the 'Editor' section.
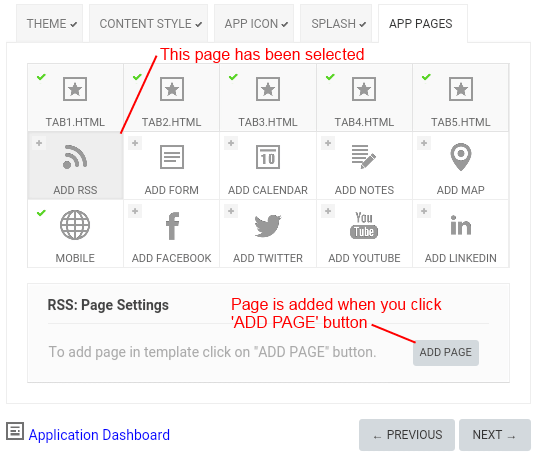

Source Code
We use HTML5, CSS3 and Javascript as our programming languages. These universal standards work on any platform.If you see a check mark in the panel then the page exists. If you see an 'x' in the panel the page has not yet been added. To add a page click on the page (panel) you want to add. Then click the ADD PAGE button. This selection is then migrated to the mobile app builder.
Be carefull when adding pages here. Adding pages here can change the "Tab1" page to an 'icon menu page.,' which you will need to edit. You can always add pages later and navigate to it in other ways.
Check the simulator before you add pages here. You may be happy with the supplied menu. If you wish to add menu items you can do that in the App Editor. When satisfied click the NEXT button.
In this case the 'next' button cycles through the pages already in the app. You get a chance to change your page selections here if you like. For instance you may want 'Tab2' to be some other page. You can convert it here or you can convert it (or any page) in the editor.
Since you can convert any page in the editor you may want to cycle through all the pages without changing them. When satisfied click the DONE button.
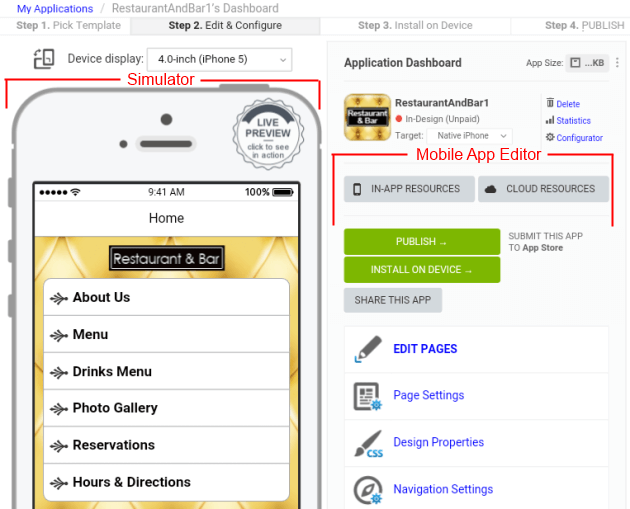
This completes the 'configure' part of Step 2 for the Mobile App Buider. You are now ready to begin the 'edit' phase of the mobile app builder. Your screen should look similar to this image.

That concludes our lesson on the mobile app builder.
Hope This Helps
Tim
See Also:
Mobile App Tutorial - for beginners. Teaches you the basics of making a mobile app.
Mobile App Editor - tutorial teaches you how to use the editor to configure and modiy your app.
Mobile App Graphics - tutorial teaches you how to create icons for the App Stores.
Mobile App Previewer - tutorial teaches you how to use the previewers to test your mobile app.
Mobile App Publisher - tutorial teaches you how to use MiAppMakers publishing tools.
Home : Mobile App Templates : Mobile App Builder

61 W. Annabelle Ave. Hazel Park,
MI. 48030-1103, U.S.A.
telephone: (248)546-0374
email: support@best-website-tools.com
© Copyright 2007-2026 All rights Reserved.
Sun: closed
Mon-Fri: 9:00AM to 6:00PM
Sat: 9AM-12:00PM
Closed Holidays
