- Services
- Dynamic Captions
- Animated Avatars
- BWT Videos
- ChatBot Agents

AI ChatbotsSupport more customers with a friendly greeting and helpful chatbot agent.
- Chatbots Category
- Video Editing
Mobile App Editor Applications Dashboard How To Build An App Tutorial
This Service DISCONTINUED
Are you Looking for a mobile app editor? The Application Dashboard tutorial teaches you how to create mobile apps for any platform or mobile device. No need to be seasoned developer to use this easy 4 step system. This editor is very intuitive. Editing an app is straight forward. Simply select your element, place it in the app and all the style tools are displayed. Making it easy to edit any part of the layout or content.We call it a dashboard because you can create, edit, publish and configure applications and style options all in the same tool. In the following tutorial we detail each setting and parameter you need to accomplish so you can build an app and publish it in the App Stores.
Application Dashboard Tutorial
-
How to use this tutorial. Important! We set up an accordion box pattern to help organize the material. To open or close the panels click Read more/less (Note: this function requires javascript be enabled)
The arrows on the right side indicate which sections are expandable. Click anywhere in the control section will open or close the collapsed content box.
The tutorial is intended for users of Miappmaker mobile app editor. Full capabilities are enabled with your 'Mobile App Plan.' New users can take advantage of our free 'Guest' account.
If you don't have your own account yet. please register first. Registration is free. You can get started creating your own app. If you decide to publish it we aill ask you to purchase anApp Plan at that time. Register now.
REGISTER for the purposes of this mobile app editor tutorial we set up a fake account you can learn with. Instructions for using the guest account are detailed in the next accordion panel (Login).We highly recommend that you register now. When you have your own account you can start building your own app right away. When you are ready to publish you can select an app plan at that time.
The 'Guest' account will ask you to select an app plan as well but you won't be able to because they are all used. You may create an app but will need permission to save it. We recommend that you register for an account if you haven't already. It is free to register.
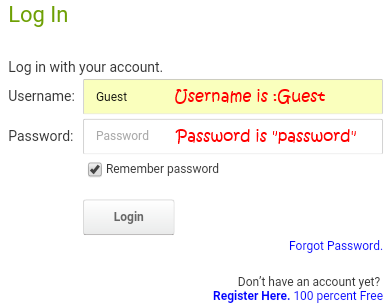
LOGIN button opens the login screen. Use your own account or use the "Guest account."Miappmaker highly recommends that you register for your own account. It is free to register and opens up all the functions refered to in this tutorial.Read more/less
Before we get started on the mobile app editor tutorial you need an app to work on. If you already have an app then use that one. If you are new to the system you can use the 'Guest' account.
Login in as "guest" password is "password."
Once logged in you are directed to the "My Applications" page. If you followed the "Mobile App Builder tutorial" you may have already created your first app. The "My Applications" page is where you manage all your apps. Go ahead and select an app to work on.

-
Button takes you to the 'Template' selector area. Pick a starter application to begin a new app. Read more/less"Select a Starter Application" loads a new template into the editor for modification. There are over 36 pre-designed business oriented templates to choose from.
Design Tip
Our sitemap lists all the template, pages and useful information inside the mobile app editor.Check out our libraries.Templates include blanks for smartphone and tablet. Please take your time to peruse the library. While you can always change the template later it is easier to start with the most suitable one.
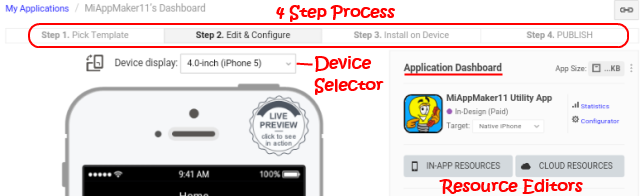
You should now see the actual "Application Dashboard" page. The mobile app editor tutorial covers step 2 in the mobile app building process.
At the top of the dashboard you will notice the 4 step buttons. Edit & configure is "Step 2" in the 4 step process. Also notice the "Resource Editors" on the right side. The IN-APP RESOURCES button contains all the elements in your app including HTML pages, images, support files and any sub-directories that you add.. The "CLOUD-RESOURCES" button leads to your cloud account (optional).
Mobile App Editor Dashboard Options
There are several areas of interest to attend to when building an app. On the left side of the editor is an interactive simulator. You will see this next in the "EDIT PAGES" option. The right side shows links to the areas that need attending. MiAppMaker Editor has grouped these sections into logical order.
-
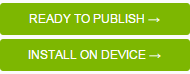
PREVIEW & PUBLISH These 2 buttons cover steps 3 and 4 in the mobile app editor process. Publishing an app requires an App Plan. Building an app can be done without registering. Read more/less
"READY TO PUBLISH" button is beyond the scope of the mobile app editor tutorial and is covered in our next tutorial Mobile-App-Publisher. This button leads to Step 4 in the process. This action is covered in the Mobile App Publisher tutorial
"INSTALL ON DEVICE" button leads to step 3 in the mobile app of the mobile app editor. Step 3 asks you to load a previewer on your mobile device. The previewer allows you to see what your app will look like when published. This is a powerful and necessary tool to have. Previewers are covered on the Mobile App Previewer page.
The previewers use the same login credentials you used to access the mobile mpp editor. You can download a previewer from one of the App Stores. Doing this step is required because some functions only work when you have access to native apps on your mobile device (like maps and phone).
-
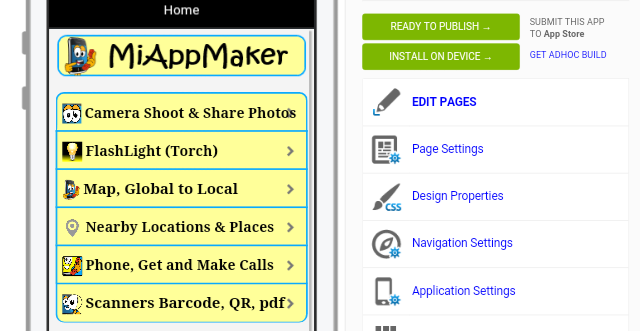
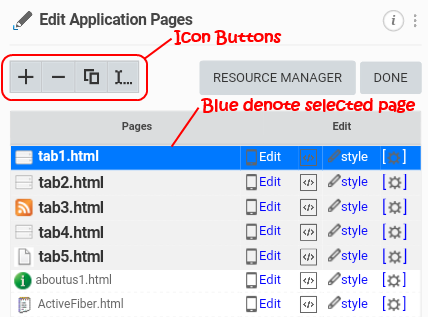
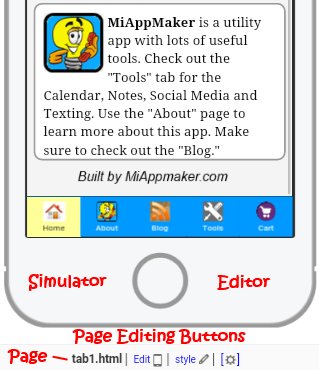
"EDIT PAGES" option. Select this button to access each page in the app.
This is where all the creativity takes place. The interactive mobile app editor/simulator combination allows you to add, subtract and modify all your pages and source material. Read more/less
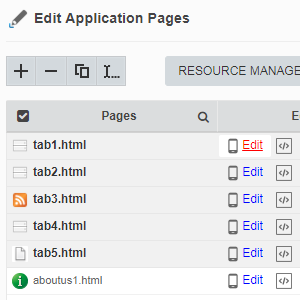
This is your 'root' directory for the app. It contains and organizes the navigation. On this screen you see the little incon buttons. This is where you can do file management for your html pages.
The "+" button will add a page to your app. Clicking on this page leads to the "Page Type" library. In the library page select the 'page type' you want and ckick "Next."
The "-" button will delete the selected page. You will be prompted to confirm that you really want to delete a page.
The "2 Pages" button allows you to duplicate the selected page.
The "I..." button allows you to rename a page. Note the first 7 (or less) pages will always be labeled tab1 thru tab7. To change which pages are on your main navigation bar you name or re-name them here.
Mobile App Editor
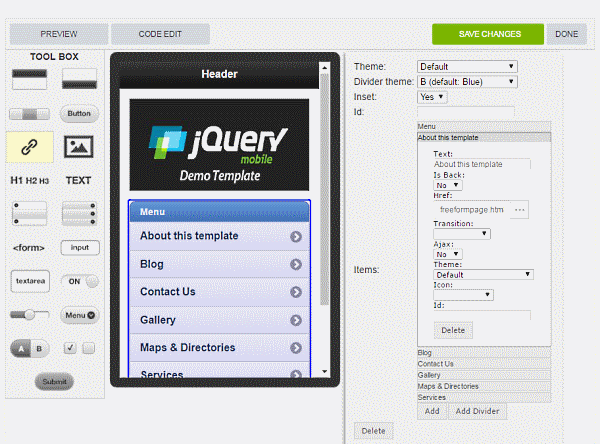
To edit a page in your app; select the page with your mouse then click on the [EDIT] button. This will open the page in the simulator. You can edit any element of your page by selecting it in the simulator then double clicking to open the interactive dialog box(es). You can lso select the raw HTML or CSS files ot edit in a text editor.
-
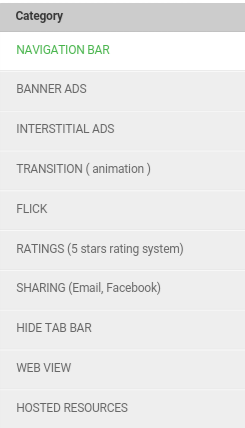
"PAGE SETTINGS" button leads to the area designed to set these functions. This area sets the 'Golbal Application' settings. Read more/less
- NAVIGATION BAR - this is where you name your pages for the title Bar in the app.
- BANNER ADS - inserts advertizements from Google AdMob and others to monetize the app.
- INTERSTITIAL ADS - insert full page ads between your own pages to monetize the app.
- TRANSITION ( animation ) - set how pages go from one to the next. Several animations are selectable.
- FLICK - sets page transitions for flick motion. Set to 'slide' or 'curl' from page to page.
- RATINGS (5 stars rating system) - shows 5 tart rating system in the navigation bar.
- SHARING (Email, Facebook) - set your sharing permissions and accounts here.
- HIDE TAB BAR - On or Off tab bar navigation setting. Use this if you desire to re-use this space
- WEB VIEW - sets scaling (zooming) permissions for web pages associated with your app.
- HOSTED RESOURCES - allows you to sync your app with servces to update information available on the web.
-
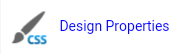
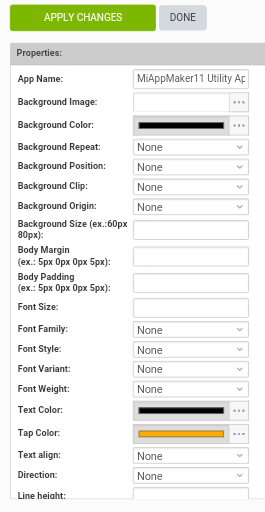
"Design Properties" button leads to the overall CSS style editor for the app. This is your 'root' directory for the app. It contains and organizes the navigation. Read more/lessHere is where you style elements like text color and backgrounds. Important! This is where you name your app for publishing and file management. If you don't name your app it will use a defult unintelligible 19 letter code. Not to worry you can change this at anytime before you publish. I highly recommend that you give your app an approriate name, it will be used as an identifier in your content management area of the mobile app editor.
You can set many styles in this area. Here is where selecting a the right template to start with pays off. All of the options are preset according to the template you selected. Not to worry you can change templates and individual element changes at any time when you edit the page. You can even change the platform if you like.
You can override the style rules in individual elements inside the each page. Many options have flyout menus you can select from. Making it easy to edit without having to know html or source coding. Once you make your selections the mobile app editor 'builds' the CSS file by simply clicking the "APPLY CHANGES" button.
BE SURE! to click 'apply changes' before you click the 'DONE" button. That is if you want to save any changes you made in the mobile app editor.
-
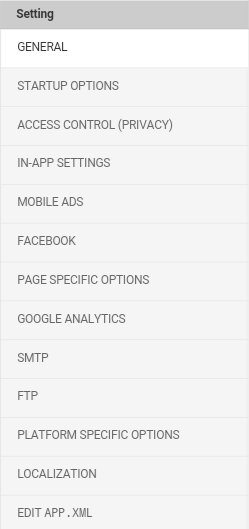
"Application Settings" area is where you set parameters and options that work on a global level. This is where you do in-app settings, mobile ads and platform specific options. Read more/less
- GENERAL - in this area you can set options for enabling 'app rotation', zoom for external site and IMPORTANTLY! add your share link for the app.
- STARTUP OPTIONS - is where you can enable a users agreement (EULA) if you desire. Or enable a 'Welcome Page' if you want one.
- "ACCESS CONTROL (PRIVACY) - allows you to set who can use this app and allow users to have an access code to restrict veiwing.
- IN-APP SETTINGS - this is where you can force or clear synced resources or restore In-App Purchases.
- MOBILE ADS - include Pollfish, AdMob, DFP and RevMob advertisement suppliers.Add your code or key here.
- FACEBOOK - this is where you input your 'Facebook App ID:'
- "PAGE SPECIFIC OPTIONS - input your PDFTron key or SHAREPOINT server URL, username and password.
- GOOGLE ANALYTICS - accout ID goes here.
- SMPT - use this section to have Form and Feedback results sent from your own email server.
- FTP - use this option if you want to share on FaceBoow with your own FTP host.
- PLATFORM SPECIFIC OPTIONS - include locaion services, In-App Purchase settings, Rate This App and Universal app settings.
- LOCALIZATION - allows you to set the default language for the app.
- EDIT APP, XML - allows you to manually edit the .xml file of your app.
Mobile App Editor Publishing Options
These next set of areas (buttons) lead to publishing tools you need to get your app listed in the app stores. We will get into the particulars in a different tutorial "Mobile-App-Publisher." Use the buttons to expand the panel for more information.
-
"NEWSSTAND PROPERTIES" button is allows you to sell Auto-Renewable or Free In-App Purchase subscriptions. Create In-App purchases for your application. Read more/lessAdd eBooks, Newspapers and Magazines to your app or publish your own articles. Select from several binding styles. Full tutorial available inside the mobile app editor.
MiAppMaker offers several templates dedicated to ebook and article publishing. We include in-app purchase and free viewing pages. We can publish many document types including Epub, HTML and .pdf formats.
There are several ways to host your ebooks online. We can help you decide which method of publication is right for your document(s).
Having a mobile app for your library makes sense because you can incorporate social media in the app. Combined with "Push Notifications' you can connect with your audience at an unprecendented level.
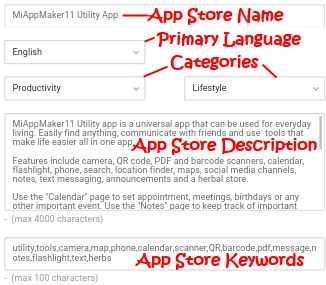
- "APP STORE PROPERTIES" button leads to the area where you prepare your app for publication in the App Stores. Read more/lessPlan on taking at least 1 hour to complete this section. You will need to create several listings for the App Stores including a 'Name' and 'Description' for your app. You will need to supply URLs for a privacy policy, a support page and marketing (optional) page.
You will need to create a list of keywords for your app. You will be asked about revision updates or a 'what's new" in this version.
DO NOT skip through this section in a hurry. You have up to 4000 characters to describe your app. Use this space wisely. This description is used in the app srore and is a very powerful selling point. You want to describe all the functionality in the app and what makes your app unique.
You get 100 characters to add App Store Keywords. Be specific with your keywords. You want to select words that people will search for. No need to duplicate any words or use plurals.
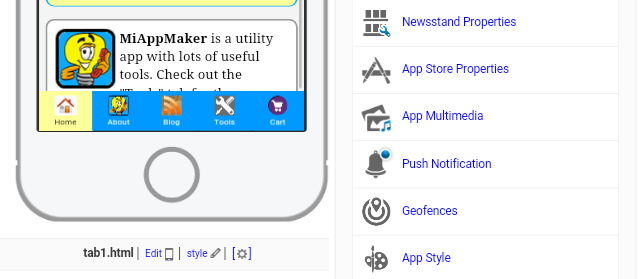
- "APP MULTIMEDIA" button leads to the area where you prepare your multimedia for publication in the App Stores. Read more/lessApp multimedia consists of several icons that need to be uploaded with your submission.
You will need to create about 20 graphic images if you plan to submit to all the app stores. If you are only submitting to one app store you will only need about 10 images. Including a splash page, app screenshots and icons.
We will help you build these icon images if you ask for a custom build. Or you can create your own icons and upload those. You will also need to create a splash screen for your app.The splash screen is displayed while your app is loading or syncing and is required. Again if you request a custom build we can make this for you. Some templates come with a generic splash screen that can be used.
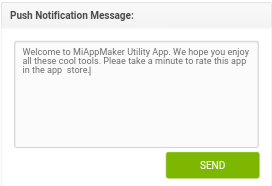
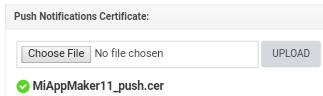
- "PUSH NOTIFICATIONS" button leads to the area where you create announcemnets that you can send to all your users. Read more/lessYour app needs to be published in the App Stores for push notifications to be activated.
Send messages to your users. A push notification will ping your users mobile device letting them know that they have a new message waiting for them. This is a great way to let people know about upcoming events, special offers or new information.
You must have an "Announcements" page in your app. PNs also requires a certificate from Apple to work. Many templates in our library already have this feature built into the app.You will need a publisher account to get this certificate. If you request a custom build you can use my publisher account and MAM will get the certificate for your app.
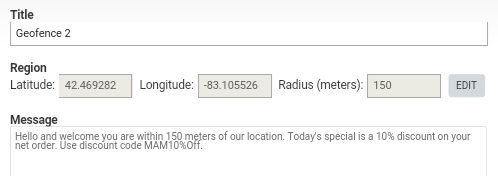
- "GEOFENCES" button leads to the area where you create announcemnets that you can send to all your users. Read more/lessGeofences send a notification to users the come within a certain range of a specified location
Input your geolocation and range, any device that comes within that range will get your latest notification.
This is an excellent marketing tool for restaurants or small businesses that have clientele that come through their door.
- "EDIT / STYLE / SETTINGS" buttons allow access to the selected page. In here you edit the layout, design, css, html files and page settings. Read more/less "EDIT" - is where you edit individual elements like div, links, text and images. When an element is selected a handy popup toolbox with every parameter is shown.
"STYLE" - brings up the 'Design Settings' options page or CSS styles for this page. As discussed above this area is where you access design settings for the selected page. Here is
where you override the general style settings.
Best practice is to make your style settings in the main "Design Properties" area. You use this button to 'override' those settings for special one page only changes.
"SETTINGS " - brings up the "PAGE SETTINGS" options page. See above descriptions for using this page.
What to do next. Start building! Register, login, select an app template, start modifying. I am here for you. Use the contact us page to ask questions. See you on the other side.
That concludes the Mobile App Editor Tutorial. Get started now or continue reading the tutorials below.
See Also:
Mobile App Tutorial - for beginners. Learn all about mobile apps.
Mobile App Publisher - tutorial teaches you how to use the publishing tools in Step 4..
Mobile App Previewer - tutorial teaches you how to use the previewers to test your mobile app.
Mobile App Plan - tutorial teaches you how to choose the right mobile app plan.Contact BWT Videos | Top of Page Home : Mobile Apps : mobile app editor
Home | Archives | Tips Blog | Articles | Categories | FAQ & A | Contact | Sitemap | About BWT | Policies
 Best Website Tools, LLC By Timothy Koen
61 W. Annabelle Ave. Hazel Park,
MI. 48030-1103, U.S.A.
telephone: (248)546-0374
email: support@best-website-tools.com
© Copyright 2007-2026 All rights Reserved.Business Hours:
Sun: closed
Mon-Fri: 9:00AM to 6:00PM
Sat: 9AM-12:00PM
Closed Holidays