- Services
- Dynamic Captions
- Animated Avatars
- BWT Videos
- ChatBot Agents

AI ChatbotsSupport more customers with a friendly greeting and helpful chatbot agent.
- Chatbots Category
- Video Editing
Image Gallery Tutorial For Solo Build It
 Here is

This tutorial is for Solo Build It websites. To make it work on other platforms requires extensive knowledge of HTML, javascript and CSS programming languages. For that you need to contact us and schedule time with one of our pros.
The concept: display a series of thumbnail images in a row. When clicked on the images expand to fill the screen and display a much larger image. Controls are added to the viewer to include forward, back, close and full screen buttons. The viewer also displays thumbnails and descriptions of each image.
little red trailer gallery


Click image to enlarge.
Easy to build gallery tool makes image galleries a breeze. Simply insert a responsive grid element, Fill in each block with an image, check the 'gallery' box and fill in a description. Tip: plan your gallery ahead of time. See the tutorial here.
Back to top of Image Gallery Tutorial
How to Make an Image Gallery Tutorial
Step 1: Create your own images first and place them in a convenient directory on your computer.. Keep in mind a gallery is a collection of images all relating to one theme. In the example above I used a 'Little Red Trailer' as my subject matter. I used a large pixel camera to get large images (2048x114px.). Do this because screensize is important. You may want to crop or reduce your images to fit your website layout. You want the image to be as big as possible to get the best effect yet small enough to fit your webspage.In the 'Little Red Trailer example all the images have been cropped an reduced to a size of 1100x695px. Each image is exactly the same size. This technique allows for smooth transitions from one picture to the next in the image gallery.
If you want to create an infographic now is the time. I used 'Paint.net' to manipulate these image. The point is you should plan out what information you want to show ahead of time. This will help reduce the build time. Try to make all your images the same size. If you add text make it all the same size and color. In this example I used 28px high text. This is large enough but more importantly it will still be readable on smaller screen sizes.
Step 2: Open up your webpage in Solo Build It Block Builder 2. Pick the location you want the gallery to appear and drag in a 'Responsive Grid' element.
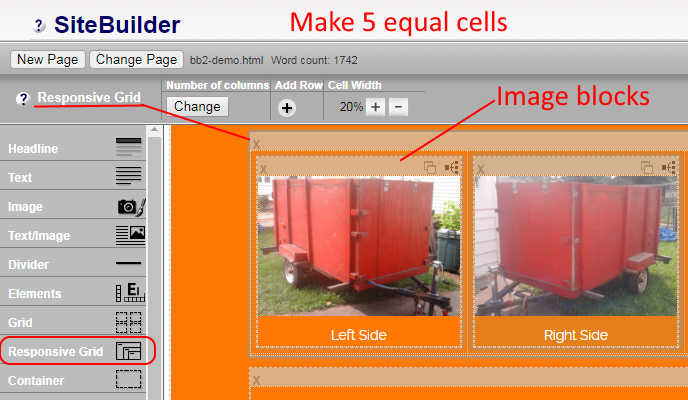
A popup dialog box appears. Select the number of columns you desire on the slider bar. The grid will be divided equally into the nuber of columns you choose.

Step 3 In BB2 drag and drop an 'Image' element into each cell.
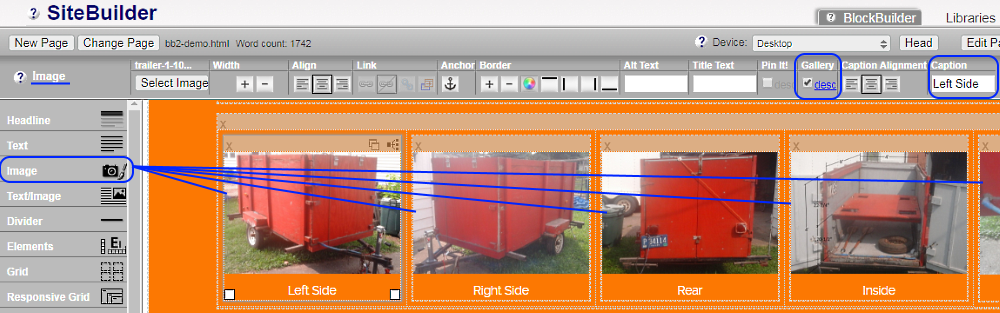
Check the 'Gallery' option in the tool bar. Click on desc and add a description to the gallery image. Repeat this process for each image. Be sure to fill in the "Alt" and "Title" option for each image.
Each image regardless of original size will be reduced to fit inside the cell block. In this example we used 1000px wide images. Notice in the gallery the images are reduced to be 20% width of the page. (This is done in BlockBuilder.) For a 4 column gallery the images would be 25% width of the responsive grid block.
Plan out your gallery by choosing image sizes and thumbnail sizes to be appropriate for yout page layout. For instance this site has a 1100px. wide screen. So, 25% or 1/5 of the screen width is 220px wide. But a screenwidth only 600px a 3 column grid would look better. So, 33% or 1/3 screen width is 200px.. Think about the size of the thumbnails you want compared to the size of the gallery/
Step 4 Check your work. Be sure to preview and test the gallery before you release it to the Internet. Some Do's and Don'ts:
- Do set 'Align' to center' This will allow the responsive nature of the grid to look and work its best. Keep in mind Since the images are displayed in a percentage of the screen size then they will need to shrink and expand from screen to screen.
- Do Fill in the 'Cation' option. This will create a link that activates the image gallery. You could skip the 'Caption' option id you do not want it. However you are then relying on the user to discover the gallery on their own.
- Do add the line of text "Click Image To Enlagre" somewhere near to the gallery. This seemingly unimportant line is a call to action. It entices the user to view the gallery.
- DO NOT use both the "Pinit' and 'Gallery' options at the same time. These two scripts both override the click command to perform their respective tasks. One override is all you get to prevent conflict. So just use 'Gallery.'
- Do refer to this image gallery tutorial as you build your own. Feel free to inspect the source code for more information.
Image Gallery Tutorial for Uploading Your Own HTML
The image gallery uses special files to control it. They are jquery.min.js, PrettyPhoto.js and PrettyPhoto.css. All these files need to be uploaded to your 'support-files' directory. You need to set up the HTML properly. You will need to create the thumbnail images and the responsive grid yourself. Or...To be honest the best way to build a gallery for UYOH is to do it first in SBI's BlockBuilder2 and then copy and paste your code into your own editor.
Unpack the zip file to your support directory. You will then upload these files to Using "Quick Upload It" into SBI. Or you can upload them with UYOH when you load the page.
Step 2A unpack and upload all the images to your "/image-files" directory in SBI.
If you use your own html editor offline you want to place the files in the appropriate directory to work on your computer.
![]()
Step 3 There are several code chunks in the head section that need to be inserted into your webpage. Place these in the <head> section of your webpage. They look like this;
This is important because my style.css file already contains the right styles to make the responsive grid work. Without that code this tutorial won't work. Contact me if you need help obtaining the code for the responsive grid.
Note 1 you will have to add your domain name to the beginning of each file call. ex: "/plugins/jquery/jquery.js" becomes "https://www.best-website-tools.com/plugins/jquery/jquery.js" Inspect the code above to see what I mean.
Ideally you want to place this code in the 'head section of your source code. If that is impractical you can load it with the page. It must be placed BEFORE the HTML code containing the images.
Note 2 this is where you can change the 'theme' See that is it currently set to 'light_square'. Simply rename this to your desired theme.
Back to top of Image Gallery Tutorial
Step 4 you need one more code chunk of javascript to activate the image gallery. Ideally you should place this just before the closing <body> tag. If that is impractical place it as close to the bottom of the content as possible. Here it is:
Note: the 'theme' can be changed here. Currently it is set to 'light_square' theme. To change themes select your theme name from the /Themes directory and rename it here and in the <head> section. Be sure to upload the corresponding images to your 'image-files' directory in SBI.
Thank you for reading Image Gallery Tutorial for Solo Build It!
Full documantation for the "prettyPhoto" javascript can be found at NO-MARGIN-FOR-ERRORS/prettyPhoto
Confused? Let Best Website Tools build it for you. We wrote the image gallery tutorial so we know how and why it works.
Home : Website Design Tips : image gallery tutorial

61 W. Annabelle Ave. Hazel Park,
MI. 48030-1103, U.S.A.
telephone: (248)546-0374
email: support@best-website-tools.com
© Copyright 2007-2026 All rights Reserved.
Sun: closed
Mon-Fri: 9:00AM to 6:00PM
Sat: 9AM-12:00PM
Closed Holidays
