- Services
- Animated Avatars
- BWT Videos
- ChatBot Agents

AI ChatbotsDelight more customers with a friendly greeting and helpful chatbot agent.
- Chatbots Category
- Video Editing
- Animated Avatars
Easy Blogs SBI Advanced Options
The Easy Blogs Advanced Options can dramatically increase the content on your website and number of pages. The following tutorial will show you how to get the most from EB.To get to the 'Advanced Options' you must first open a blog in the software. After you open a blog you will see the main page. This is where you get to all the sections in the software. First Select "Options' then this screen should be showing.
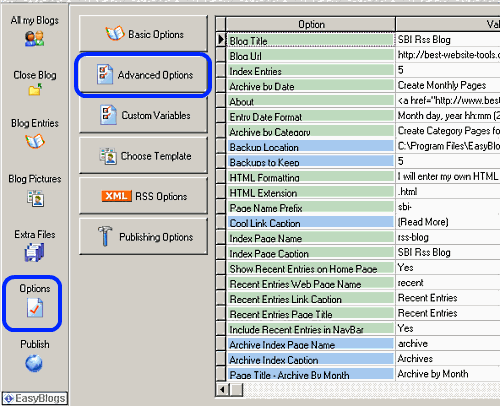
Next select "SBI Advanced Option". This screen will show.
Let's take a look at each of the selections in SBI Advanced Options to see what they all do.
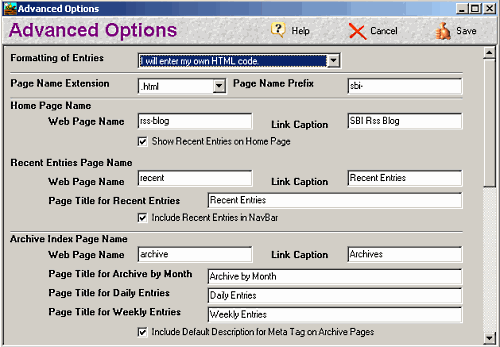
- "I will enter my own html"
- "EasyBlogs will try to format each entry".
Select option "I will enter my own html" here. When you format the html yourself it will be correct. At least that is the plan. If you allow EB to try and format each entry it can do funny things to your special codes like script files that need the code to be in an exact format. Fortunately the template editor will build your code nice and clean.
Page Name Prefix.
- This option will prefix every html page with what ever you put in the box. ONLY USE this option if this is your second blog on the same website. Otherwise leave it blank. Note; you get a limit of 100 rss feeds with this software. Secondary blogs on the same website need to have this option filled in.
Home Page Name - has 3 SBI Advanced Options.
- "Web Page Name". Choose wisely here as this name will be used as the name of your blog. If you are using EB to create a website from scratch you will want this to be your index page. In that case you need to name the page "index".
If you adding a blog to an existing website the name this page appropriately. - "Link Caption" is the name of the link in the navigation menus. This is the name of the blog and should be the same as your 'Web Page Name'.
- "Show Entries on Home Page". When using the home page as your blog page you will want this box checked. It want your blog posts on the top page make sure this box is checked. You also get a chance to edit your home page in the 'Blog Entries' editor. When using this page as a blog your 'Home' page will be left blank except for the Main title (which should be the same as your blog name).
If you want to put your blog posts on a different page (recent entries) then leave this box unchecked. Which brings us to...
Recent Entries - has 4 SBI Advanced Options.
- "Recent Entries Page Name". If you are using EB as an add on to your main website you can simply leave it as "recent". But if you are using EB to create a website from scratch or are not using your home page to post entries then you should name it the same as your blog name. Remember page names need to have no empty spaces. A dash or underscore can be used to separate words if you wish.
- "Link Caption" - is the name of the link in the navigation menus. You can leave it as "Recent Entries" or change it to whatever you want but don't make it more than 20 characters long.
- "Page Title for Recent Entries" - this is the title that goes at the top of this page. You can leave it as "Recent Entries" if you use your home page for posting entries. If you are using this page as the only place you are posting entries then it should be the name of your blog.
- "Include Recent Entries in Your NavBar". This should be checked all the time. This creates the "Recent Entries" page. If you leave this unchecked EB will not make this page. This is especially important if you elect to NOT put entries on your hoe page.
Archive Index Page - has 6 SBI Advanced Options.
- Use the same methods mentioned above to name your pages and links.
- "Include default Description for Meta Tag on Archive Pages". Make sure this is checked. Your template automatically will add the meta description to this page. If this is unchecked you won't get your default or any other description on this page.

Article Index Page - has 7 SBI Advanced Options.
- Use the same methods mentioned above to name your pages and links.
- "Include Article Index in NavBar". If this option is checked you will get the "Articles" page name in your navigation structure. If you don't use the articles function then you won't need this. However, I can't imagine why you wouldn't want your articles to be included on your blog, in your xml file and rss feeds.
You should use articles in your blog as this is the single most powerful tool you have. When you make an article EB creates a new page just for the rticle.
- "Show Articles grouped by month". If this option is checked your articles will be grouped by month, on the 'Articles' index page.
- "Include Article Teasers on Article Index". If this option is checked it will add the 'article teaser' from the meta tags tab in the 'Blog Entries' editor. When you blog is young you might want this to be checked. When your blog gets older and has a lot of articles in then this page may get really long.
- "List style" - 4 SBI Advanced Options.
Line Break <BR>
Paragraph <P>
Unnumbered List <UL>
Numbered List <OL>
I think the 'Paragraph' option looks the best when using teaser and "Line Break" is best when teasers are not used.
See Articles-Howto for more info.
Category Index Page - has 6 SBI Advanced Options.
- Use the same methods above to name your pages and links.
- "Include Category Index in NavBar". Check this option if you want the 'Category Index' listed in your navigation. If you don't use categories then you are missing out on one of EB's best features. See Category setup tutorial for more info.
- "Include Teasers on Category Index". You will need to be careful with this one, the new css templates have the Category index included in the bottom navigation row. Some of the new templates have a 'Categories' NavBar included. If this box is checked the teasers will show in the navbar. If you want teasers to show on the Category index page then you may want to eliminate the NavBar.
- "List Style" - 4 options. For categories I like to use the "Paragraph" option when teasers are used, and "Line Break" when teasers are not used.
Articles URL's
- "Link Caption" - I like "Read Full Article" for this option as this link shows up at the end of the teasers you write. The article teasers will go into the blog posts with the teaser and not the full article.
Cool URL's
- "Link Caption" - I like to use "Read More" instead of "Go To URL" for this option. This is the link caption that is created when you put a URL in the "Include a link to this URL" in the 'Blog Entry' editor.
Parent Site (Optional)
- "URL" - this will be a link to your main website. If you are using Easy Blogs as your main website then leave this blank.
- "Link Caption" this is the name of the link that will appear in your navigation
Conclusion: SBI Advanced Options
To get the most out of your Easy Blog you should have all the options filled in and all the checkboxes in 'Advanced Options' checked. This will create the maximum number of pages and the most content on your blog. Filling in all the information in this section will give you the most items in your navigation. You may need to play around with the 'Teaser' options to get the desired effect.
For more SBI Advanced Options tutorials like this one please visit SBI-Rss-Articles page...
Home : SBI Home : SBI Rss Tutorials : sbi advanced options, blog, article, categories, content


61 W. Annabelle Ave. Hazel Park,
MI. 48030-1103, U.S.A.
telephone: (248)546-0374
email: support@best-website-tools.com
© Copyright 2007-2024 All rights Reserved.
Sun: closed
Mon-Fri: 9:00AM to 6PM
Sat: 9AM-12:00PM
Closed Holidays
