- Services
- Animated Avatars
- BWT Videos
- ChatBot Agents

AI ChatbotsDelight more customers with a friendly greeting and helpful chatbot agent.
- Chatbots Category
- Video Editing
- Animated Avatars
EasyBlogs Template System Tutorial
This is also a good tutorial for anyone who wants to modify the templates or even build your own template from scratch. Once you get to know how it all works, it can be really quite fun to play with the templates.
This tutorial is also for anyone who is having trouble with any of the extra coding in the sections of your template. If this is still a mystery after you read this feel free to contact me.
Let's begin with an overview:

Each template has a "Default Layout" Page, a "Home Page" and an "articles page" and a corresponding "Start of Page," "Each Entry" and "End of Page" section. These are the main sections of the template.
To say it another way, a full page of code is broken into the 3 main sections of "Start of Page," "Each Entry" and "End of Page." The 3 main sub-templates are the "Home Page," "Default Layout," and "Articles" Pages.
There are also a "before entries" and "after entries" sections that can be used to add recurring snippets like a social bookmark.
If you were to copy the code from each of these sections and put them into an HTML editor or WYSIWYG website program (such as Front Page or Dreamweaver), you would see how that page would look in it's entirety on the web.
FYI: The "Default Layout" Page is for all the pages in your blog except the Home Page and article pages. The reason they are different is because the Home Page contains different components than the other pages such as the "About This Blog" information (which is only on the Home Page). And the Article page has a cleaner look and feel more like typical tier 2 website page.
Inside The EasyBlogs Template System
The first screen that you see after you open your template is the "Default Layout " page of the template.
Notice that the "Default Layout" is indicated in the box to the right which says, "Default Template" (circled in red below).
Default Layout = Default Template
easyblogs template system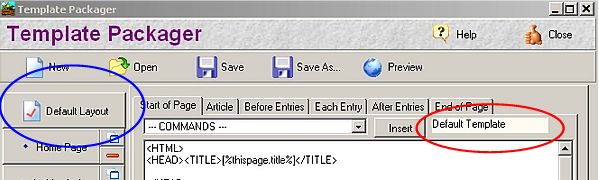
Now, notice that the tab labeled, "Start of Page" is raised (okay, it is not very noticeable but take a sharper look and you will see that it is, indeed, raised!). This indicates that you are in a particular section of the template called "Start of Page."
Please pay attention here. You will be able know which page you are on by returning to the "Start of Page" section of the template and looking to the right, in the box, unless you can easily distinguish when the Default Layout tab is raised!
easyblogs template system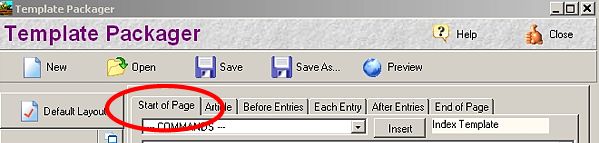
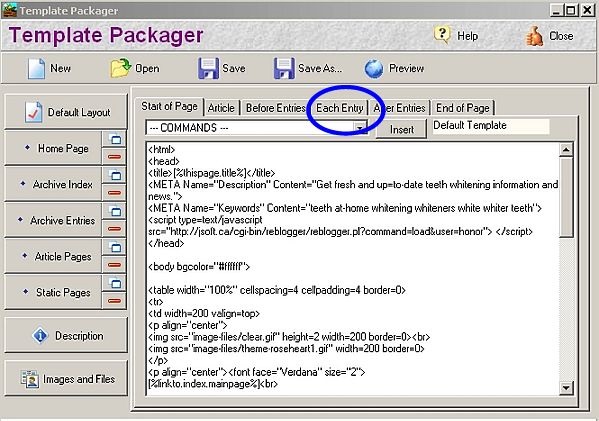
Now, staying in the Default Layout page, click on the tab, "Each Entry." Notice how the tab it slightly raised. You are now n the section of the Default Page that contains the code for the entries part of your blog.
easyblogs template system
Now, click on the tab that says, "End of Page." Again, notice how the tab it slightly raised. You are now in the section of the "Default Layout" Page that contains the code for the end of that page!
easyblogs template system
Okay, now let's do the same thing for the "Home Page" of the template.
First, click on the "Home Page" tab to the left.
You know you are in the Home Page section of the template when you see the words,"Index Template" in the right hand box (circled in red below.) You also know when you see the Meta tags for Description and Keywords (circled in green).
Home Page = Index Template
easyblogs template system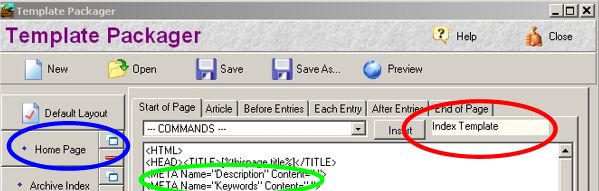
easyblogs template system
Now, click on the tab that says, "End of Page." Again, notice how the tab it slightly raised. You are now in the section of the Home Page that contains the code for the end of that page!
easyblogs template system
One last section is the "Article Pages" of the template.
First, click on the "Article Pages" tab to the left.
You know you are in the Home Page section of the template when you see the words, "Index Template" in the right hand box (circled in red below.) You also know when you see the Meta tags for Description and Keywords (circled in green)
Article Pages = Article Template
easyblogs template system
What's important and different about the Article Pages section of the template is that you use the "Article" tab instead of the "Each Entry" tab.
It is in the "Article" section of the "Article Pages" that you can create.
easyblogs template system
Whew! That's it.

The other buttons on the left panel below the Home Page button, are all empty. If you are into coding these, you can make different pages of your template contain different information. The COMMANDS box, contains the variables that are used to insert special information in areas of your template.
Basically, most everyone will just leave these alone and don't touch. Someone who wants to code their own template would use these.
Please refer to the Help button in the top of your EasyBlogs software and go to the category for Templates to learn more about the Commands/Variables to build your own template from scratch or to seriously modify any of the templates.
Now, one more thing is to understand how the preview works.
To preview your template that includes the 2 different pages (with all 3 sections), click on the Preview button (always click the Save icon when making changes to your templates before previewing).
easyblogs template system
After you click on Preview, the following page opens in your browser.
Now, preview the "Home Page with ENTRIES" and then click back to this page and click on the "Archive Page with ENTRIES." These two views show you the pages in their basic structure and how they will look once posted (uploaded) to your website.
Remember, that you are only seeing the pages without the information that is specific to your blog. The Preview is to show you how it will look in general.
easyblogs template system
Click on any of the previews to see how it looks in your browser. Since you are not looking at content you won't see any posts. But the representations are easily recognized. This is especially useful if you are previewing additional coding such as script files or AdSense placement. When you are satisfied the page looks correct.
Always be sure to click Save ![]() in the top menu bar to save your any code insertions you have made and before you close
in the top menu bar to save your any code insertions you have made and before you close ![]() the screen!
the screen!
That wraps up Easy Blogs Template System SBI Rss Tutorial. To get the full software and tutorial look here.
EasyBlogs Software And Tutorial
 Step by step instructions to create up to 100 blog/websites. Includes 326 page ebook.
AKA SBI RSS Tutorial
Only
Customer Service - No matter what time of day I'm here for you. Unlike other design firms I work all the time, days, nights, weekends and holidays. I'm just a phone call or email away. Get free advice for 30 days forever. Learn more...
Home : Easy Blogs Tutorials : EasyBlogs Template System


61 W. Annabelle Ave. Hazel Park,
MI. 48030-1103, U.S.A.
telephone: (248)546-0374
email: support@best-website-tools.com
© Copyright 2007-2024 All rights Reserved.
Sun: closed
Mon-Fri: 9:00AM to 6PM
Sat: 9AM-12:00PM
Closed Holidays
